Bypassing Windows audio mixer *
Due to its basic purpose to process the audio signals, i.e. to set their levels, mix them and convert between different bit depths and sample rates, there is a strong reason to bypass Windows audio mixer, so long as the PC is used for high quality playback only. This is because in this case the actual requirement is to preserve the data integrity or, in other words, the goal is so-called bit perfect output. And even though with some care it is still possible to achieve this goal with a mixer included, a much safer option is to bypass it, and let the applications communicate directly with audio hardware, by using ASIO.
If you accept this recommendation, we also recommend using Foobar2000, and following these steps. The procedure applies to all Audial USB DACs, and it can be used with most of the other DACs too.
1. Download and install Foobar2000.
2. Download and install ASIO4ALL. Audial Model S USB or USB board users can skip this step, and use Audial / Gramofone ASIO, which is included in the Windows driver.
3. Download and install ASIO support for Foobar2000.
With older Foobar2000 versions it was enough to unzip the .dll file and copy it to the Foobar2000 components folder (probably c:\Program Files\foobar2000\components), and the component worked. Recently Foobar2000 has its own .fb2k-component format. If .fb2k-component file extension is already associated in your system with Foobar2000, you can install the component by double-clicking the file (e.g. in Windows Explorer, Total Commander, etc.), and Foobar2000 will do the rest. Otherwise, you will have to open the Foobar2000 File > Preferences window, and under Components use the “Install…” button to find the file, and then to click OK (or Save All).
4. Now (re)start Foobar2000, in case it did not do itself.
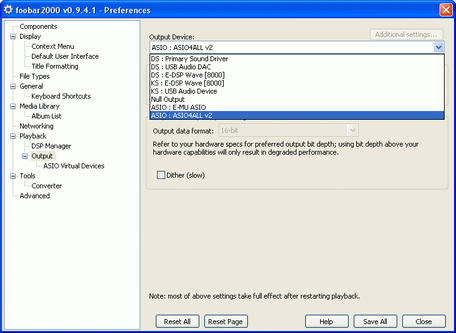
5. In the Foobar2000 main window, go to File > Preferences. In the Preferences window, under Playback > Output, you will now find ASIO drivers, and from drop down list on the right side, you can choose your option. Click OK (or Save All).
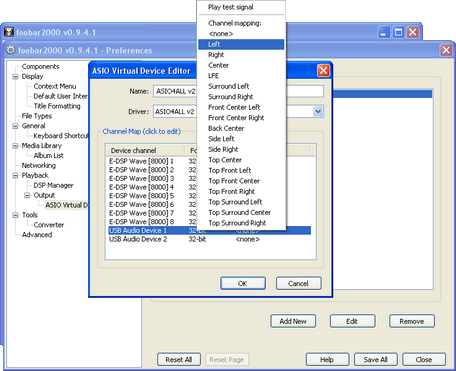
6. In most cases following the steps above will be enough. Channels will be probably assigned automatically, but in case it is necessary, you can define your own channels mapping: select ASIO you want to use, and in the Custom channels mapping area click the button Add New. For a stereo setup, Channel 1 should be left, and Channel 2 should be right. Click OK. To use such a custom channels mapping, once you add it, you will also have to select it as output (as described in the previous step).
That’s all.
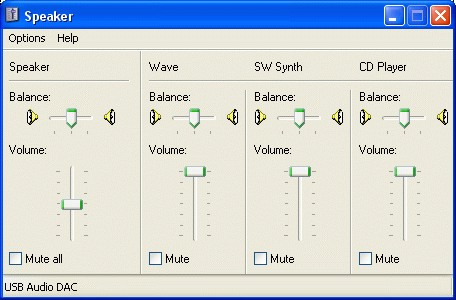
To check whether you were successful in this or not, open the Mixer. Please make sure that you choose an appropriate audio device, and not some other device you may possibly have in the system. If all is done well, moving the Wave (or Applications) slider will have no effect on the playback volume.
As for the Foobar2000 itself, please make sure its own volume control is set to the maximum (as is by default), and DSP utilities are inactive.
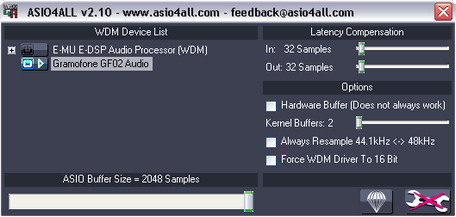
Regarding the ASIO4All, some of its versions appeared to perform resampling by default setting, which was exactly what we wanted to avoid here. So, to ensure that the ASIO4ALL alone is also set appropriately, please open its “Off-Line” control panel, and make sure that the “Always Resample 44.1kHz <-> 48kHz” box is unchecked. For a similar reason, “Force WDM Driver To 16 Bit” should be unchecked too (please refer to ASIO4ALL Instruction Manual for further information).
Starting with Windows Vista (2007), a Windows Driver Model (WDM) with Kernel Audio Mixer (kMixer), which was used in Windows 98 / Me / 2000 / XP, was replaced by Universal Audio Architecture (UAA) with Windows Audio Session Application Program Interface (WASAPI). WASAPI can operate in shared or exclusive mode, which lets applications share or take exclusive control over given audio hardware, respectively, later supposedly bypassing Windows audio mixer, and hence performing the similar task as ASIO (even if the WASAPI path still involves more steps). A necessary WASAPI component for Foobar2000 is available, and can be installed and activated the same way as the ASIO component (steps 3 – 5).
Copyright © 2006, 2011, 2015, 2017 Audial
___________________
* – The article was originally published in 2006, to provide guidance on bypassing the Windows kMixer of those days. Even though the most of original text still applies, it was updated, to reflect the changes in Windows audio architecture and associated applications.


